Re-Think GoDaddy.com. $5.99 .COM!

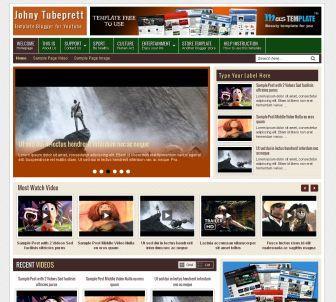
Johny Tubeprett for Youtube Only

Johny Tubeprett for Youtube Only

Johny Tubeprett template made for video content only from Youtube.

There's so many feature in this template. It's a white and brown color with 4 column blogger in there, easy loading with elegant looks, 1 right sidebar, 3 columns footer, navigation drop down menu, grid and list style, tab widget categories, clean design template, tag H1 and H2 ready, and more. This template suitable for video content blog with daily updates only from Youtube. But you can use it for any gallery images content for your blog.

How to post a video on this exact template? These template Idly While Waiting Germany Vs Greece. For installation of other features that exist in this template, please refer to the following explanation:

  1. Slider on which I put on this template works featuring recent post, if you want to change the display per label / category.
  2. Widget "Type Your Label Here" which in addition to sliders, as always go to Layout, select the Type Your Label Here on the blog post >> click Edit, and then type a label on the box, the last Save. See the image below for more details:
    Johny Tubeprett for Youtube Only
  3. Widget Tab View category
    First, to change the title of the tab (Adventure, Action, Bike Games and so on) look for the following code in the Edit HTML:
    Title1="Adventure";Title2="Action";Title3="Bike Game";Title4="Dress-Up";Title5="Strategy";Title6="Sport Game"

    Having found the above article change the blue color with the title you want to display on the tab view widget category.
    Second, to fill the widget tab view with a label that you want to install there, locate the following code in the Edit HTML (do not forget to check expand widget templates):

    <div class='tab-wrapper'>
    <div class='tabber' id='tab1'>
    <script>
    document.write(&quot; &lt;script src=\&quot;/feeds/posts/default/-/comedy?max-results=&quot;+numposts2+&quot;&amp;orderby=published&amp;alt=json-in-script&amp;callback=showrecentposts1\&quot;&gt;&lt;\/script&gt;&quot;);
    </script></div>
    <div class='tabber' id='tab2'>
    <script>
    document.write(&quot; &lt;script src=\&quot;/feeds/posts/default/-/jazz?max-results=&quot;+numposts2+&quot;&amp;orderby=published&amp;alt=json-in-script&amp;callback=showrecentposts1\&quot;&gt;&lt;\/script&gt;&quot;);
    </script></div>
    <div class='tabber' id='tab3'>
    <script>
    document.write(&quot; &lt;script src=\&quot;/feeds/posts/default/-/comedy?max-results=&quot;+numposts2+&quot;&amp;orderby=published&amp;alt=json-in-script&amp;callback=showrecentposts1\&quot;&gt;&lt;\/script&gt;&quot;);
    </script></div>
    <div class='tabber' id='tab4'>
    <script>
    document.write(&quot; &lt;script src=\&quot;/feeds/posts/default/-/jazz?max-results=&quot;+numposts2+&quot;&amp;orderby=published&amp;alt=json-in-script&amp;callback=showrecentposts1\&quot;&gt;&lt;\/script&gt;&quot;);
    </script></div>
    <div class='tabber' id='tab5'>
    <script>
    document.write(&quot; &lt;script src=\&quot;/feeds/posts/default/-/comedy?max-results=&quot;+numposts2+&quot;&amp;orderby=published&amp;alt=json-in-script&amp;callback=showrecentposts1\&quot;&gt;&lt;\/script&gt;&quot;);
    </script></div>
    <div class='tabber' id='tab6'>
    <script>
    document.write(&quot; &lt;script src=\&quot;/feeds/posts/default/-/jazz?max-results=&quot;+numposts2+&quot;&amp;orderby=published&amp;alt=json-in-script&amp;callback=showrecentposts1\&quot;&gt;&lt;\/script&gt;&quot;);
    </script></div>
    <div class='clear'/>
    </div></div>
    Replace all the blue text on the code above, with the label you want to display.
  4. Popular Post Widget
    Go to Layout >> select >> New Post thumbnail check box only, leave the box blank snippet.


Download Template Now!

Google Plus Blogger Template


Download Template Now!


Free Dark Social Media Bookmark Icon


Download Template Now!


Free Social Media Bookmark Icon


Download Icon Now!

How To Create Most Popular Post Widget


The previous widget for showing Popular posts (most commented), has been stopped working, so here's a new code for the widget.

Steps:

Log in to Blogger
Go to Layout => Add a Gadget => HTML/JavaScript

You just need copy and paste code below in to the widget:


  1. <script type="text/javascript">
    function pipeCallback(obj) {
    document.write('<ul style="text-transform: capitalize;">');
    var i;
    for (i = 0; i < obj.count ; i++)
    {
    var href = "'" + obj.value.items[i].link + "'";
    var item = "<li>" + "<a href=" + href + ">" + obj.value.items[i].title + "</a> </li>";
    document.write(item);
    }
    document.write('</ul>');
    }
    </script>
    <script src="http://pipes.yahoo.com/pipes/pipe.run?_render=json&_callback=pipeCallback&_id=28a6afad7c6ba1288c1b738277e42385&url=http%3A%2F%2FYOUR_BLOG_ADDRESS_HERE_WITHOUT_http://&num=10" type="text/javascript"></script>
    <a href="http://hi-template.blogspot.com" target="_blank"><span style="font-size: xx-small;">Popular Posts Widget</span></a>

    NOTE: REPLACE everything in YOUR_BLOG_ADDRESS_HERE_WITHOUT_http:// in the code above with your blog's address without typing http://

    The above code displays 10 posts, you can change it by editing the number being displayed in blue !

    Code displays the titles like:
    Post one (18)
    Post two (14) etc.


  2. <script type="text/javascript">
    function pipeCallback(obj) {
    document.write('<ol style="text-transform: capitalize;">');
    var i;
    for (i = 0; i < obj.count ; i++)
    {
    var href = "'" + obj.value.items[i].link + "'";
    var item = "<li>" + "<a href=" + href + ">" + obj.value.items[i].title + "</a> </li>";
    document.write(item);
    }
    document.write('</ol>');
    }
    </script>
    <script src="http://pipes.yahoo.com/pipes/pipe.run?_render=json&_callback=pipeCallback&_id=ML4p0UfW3RGgS7iN1JzWFw&url=http%3A%2F%2FYOUR_BLOG_ADDRESS_WITHOUT_http://&num=10" type="text/javascript"></script>
    <span style="font-size: 80%">Widget by <a href="http://hi-template.blogspot.com">Blogger Widgets </a></span>

    Code displays the titles like:
    Post one (18 comments)
    Post two (14 comments),


  3. In case if you want to display the popular posts without the number of comments you just need using this code:

    <script type="text/javascript">
    function pipeCallback(obj) {
    document.write('<ol style="text-transform: capitalize;">');
    var i;
    for (i = 0; i < obj.count ; i++)
    {
    var href = "'" + obj.value.items[i].link + "'";
    var item = "<li>" + "<a href=" + href + ">" + obj.value.items[i].title + "</a> </li>";
    document.write(item);
    }
    document.write('</ol>');
    }
    </script>
    <script src="http://pipes.yahoo.com/pipes/pipe.run?_render=json&_callback=pipeCallback&_id=1a1c6e4e6d4f148e3650fda46910e15f&url=http%3A%2F%2FYOUR_BLOG_ADDRESS_WITHOUT_http://&num=10" type="text/javascript"></script>
    <span style="font-size: 80%">Widget by <a href="http://hi-template.blogspot.com">Blogger Widgets </a></span>


Studiopress Magazine v.2 for Blogger


This Template is the 2 column Magazine template originally a wordpress Theme designed by Studiopress and we have converted this Template into blogger for blogger blogs.This template is also absolutely free for all users who want it to use it for their blogger blogs.

Features

  1. This is a two fixed free blogger Template.

  2. This Template is Google Adsense Optimized.

  3. This Template has got 6 tabbed menu.

  4. This Template has got sidebar enews and updates box.

  5. This Template has got the customized blogsearch engine.

  6. This Template has got customized dropdown category(labels) widget with the menu bar.

  7. This Template has got breadcrumb menu to each posts.

  8. This Template has got two menu bars.


Download Template Now!


Revolution City Blogger Template

Revolution City Blogger Template
To use the Template without the frontpage or to use the template without the Frontpage Select the Following code in your blogger Template Edit Html Page without Expanding widget templates.


<b:if cond=’data:blog.url == data:blog.homepageUrl’>
<div id=’homepage’>
<div id=’homepagetop’>
<div class=’hptabber’>
<!--This section is where the custom images are found for the homepage tabber - note the custom field name for this image is "homepage". Recommended image size is 600x200, as the stylesheet is written for this size.-->
<div id=’featured’>
<div id=’myGallery’>
<div class=’imageElement’>
<h2>Welcome to South Beach</h2>
<p>This is an example of a WordPress post, you could edit this to put information about yourself or your site so readers know where you are coming from. You can ...</p>

<a class=’open’ href=’http://www.revolutiontheme.com/city/featured/welcome-to-south-beach.htm’ title=’Read More’/>
<img class=’full’ src=’http://www.revolutiontheme.com/city/images/welcome.jpg’/>
<img class=’thumbnail’ src=’http://www.revolutiontheme.com/city/images/welcome.jpg’/>
</div>
<div class=’imageElement’>
<h2>Enjoy the Nightlife of Miami</h2>
<p>This is an example of a WordPress post, you could edit this to put information about yourself or your site so readers know where you are coming from. You can ...</p>
<a class=’open’ href=’http://www.revolutiontheme.com/city/featured/enjoy-the-nightlife-of-miami.htm’ title=’Read More’/>

<img class=’full’ src=’http://www.revolutiontheme.com/city/images/nightlife.jpg’/>
<img class=’thumbnail’ src=’http://www.revolutiontheme.com/city/images/nightlife.jpg’/>
</div>
<div class=’imageElement’>
<h2>Experience Luxury in South Beach</h2>
<p>This is an example of a WordPress post, you could edit this to put information about yourself or your site so readers know where you are coming from. You can ...</p>
<a class=’open’ href=’http://www.revolutiontheme.com/city/featured/experience-luxury-in-south-beach.htm’ title=’Read More’/>
<img class=’full’ src=’http://www.revolutiontheme.com/city/images/luxury.jpg’/>

<img class=’thumbnail’ src=’http://www.revolutiontheme.com/city/images/luxury.jpg’/>
</div>
<div class=’imageElement’>
<h2>The Best Spring Break Experience</h2>
<p>This is an example of a WordPress post, you could edit this to put information about yourself or your site so readers know where you are coming from. You can ...</p>
<a class=’open’ href=’http://www.revolutiontheme.com/city/featured/the-best-spring-break-experience.htm’ title=’Read More’/>
<img class=’full’ src=’http://www.revolutiontheme.com/city/images/relax.jpg’/>
<img class=’thumbnail’ src=’http://www.revolutiontheme.com/city/images/relax.jpg’/>

</div>
<div class=’imageElement’>
<h2>Upscale Shopping on Lincoln Avenue</h2>
<p>This is an example of a WordPress post, you could edit this to put information about yourself or your site so readers know where you are coming from. You can ...</p>
<a class=’open’ href=’http://www.revolutiontheme.com/city/featured/upscale-shopping-on-lincoln-avenue.htm’ title=’Read More’/>
<img class=’full’ src=’http://www.revolutiontheme.com/city/images/shopping.jpg’/>
<img class=’thumbnail’ src=’http://www.revolutiontheme.com/city/images/shopping.jpg’/>
</div>
</div>
</div>

></div>
</div>

<div id=’homepagemiddle’>
<div id=’homepageleft’>
<div class=’featured’>

<h3>Category #1</h3>
<b:section class=’homepageleftwidget’ id=’homepageleftwidget’ preferred=’yes’>
<b:widget id=’HTML5’ locked=’false’ title=’’ type=’HTML’/>
<b:widget id=’HTML8’ locked=’false’ title=’’ type=’HTML’/>
<b:widget id=’HTML3’ locked=’false’ title=’’ type=’HTML’/>
</b:section><div style=’margin-bottom:10px;’/>
<b><a href=’#’>Read More Posts From This Category</a></b>

</div></div>
<div id=’homepageright’>
<div class=’featured’>
<h3>Category #2</h3>
<b:section class=’homepagerightwidget’ id=’homepagerightwidget’ preferred=’yes’>
<b:widget id=’HTML7’ locked=’false’ title=’’ type=’HTML’/>
<b:widget id=’HTML6’ locked=’false’ title=’’ type=’HTML’/>
<b:widget id=’HTML4’ locked=’false’ title=’’ type=’HTML’/>
</b:section><div style=’margin-bottom:10px;’/>
<b><a href=’#’ rel=’bookmark’>Read More Posts From This Category</a></b>

</div>
</div>
</div>
<div id=’homepagemiddle’>
<div id=’homepageleft’>
<div class=’featured’>

<h3>Category #3</h3>
<b:section class=’homepagebotleftwidget’ id=’homepagebotleftwidget’ preferred=’yes’>
<b:widget id=’HTML85’ locked=’false’ title=’’ type=’HTML’/>
<b:widget id=’HTML88’ locked=’false’ title=’’ type=’HTML’/>
<b:widget id=’HTML83’ locked=’false’ title=’’ type=’HTML’/>
</b:section><div style=’margin-bottom:10px;’/>
<b><a href=’#’>Read More Posts From This Category</a></b>

</div></div>
<div id=’homepageright’>
<div class=’featured’>
<h3>Category #4</h3>
<b:section class=’homepagebotrightwidget’ id=’homepagebotrightwidget’ preferred=’yes’>
<b:widget id=’HTML97’ locked=’false’ title=’’ type=’HTML’/>
<b:widget id=’HTML96’ locked=’false’ title=’’ type=’HTML’/>
<b:widget id=’HTML94’ locked=’false’ title=’’ type=’HTML’/>
</b:section><div style=’margin-bottom:10px;’/>
<b><a href=’#’ rel=’bookmark’>Read More Posts From This Category</a></b>

</div>
</div>
</div>
</div>

<b:else/>
<div id=’contentleft’>
<div class=’postarea’>
<b:section class=’contentleft’ id=’contentleft’ showaddelement=’no’>
<b:widget id=’Blog1’ locked=’true’ title=’Blog Posts’ type=’Blog’/>
</b:section>
</div> </div>

</b:if>


Now replace the above code with the following code then Save your Template and you are finally done. While Saving the Template you might be asked to delete some widgets.In that case use the delete the widget option.


<div id=’contentleft’>
<div class=’postarea’>
<b:section class=’contentleft’ id=’contentleft’ showaddelement=’no’>
<b:widget id=’Blog1’ locked=’true’ title=’Blog Posts’ type=’Blog’/>
</b:section>
</div> </div>


Download Template Now!

WooThemes - The Gazette Edition Converted for Blogger Free

WooThemes - The Gazette Edition Converted for Blogger Free

Actually "Gazette" is a Premium wordpress theme made for WordPress blogs created by woothemes.com. Its pretty cool, so I have Converted this "Gazette Edition" into blogger Theme for The Blogger Users. Hope you will love this Template.

Features

  1. This template is a three columned.

  2. This Template has got 3 perfect areas for placing ads.

  3. This Template has got auto read more feature on Home page,labels page and archive pages.

  4. This template has got two perfect menus above and below the header.

  5. This Template has got Content slider widget on Front page.

  6. This Template has got the 5 tabbed menu that shows your Popular posts,Recent posts,recent comments,Tags and Subscription widget.

  7. This Template is absolutely free to download from here.

  8. and many more…


Configuration

  1. Top above header Menu Customization.

    Customize the Top above header placed above your blog header, Find The following code in the Template and Edit it with your own Link and Titles.

    <div id=’nav-left’>
    <ul id=’nav1’>
    <li><a expr:href=’data:blog.homepageUrl’ title=’Home’>Home</a></li>
    <li>
    <a href=’#’ title=’About’>About</a>
    <ul>
    <li><a href=’#’ title=’Sub page 1’>Sub page 1</a></li>
    <li>
    <a href=’#’ title=’Sub Page 2’>Sub Page 2</a>
    <ul>
    <li><a href=’#’ title=’Sub2 Page 1’>Sub2 Page 1</a></li>
    <li><a href=’#’ title=’Sub2 Page 2’>Sub2 Page 2</a></li>
    </ul>
    </li>
    <li><a href=’#’ title=’Sub Page 3’>Sub Page 3</a></li>
    </ul>
    </li>
    <li><a href=’#’ title=’Archives’>Archives</a></li>
    <li><a href=’#’ title=’Image Gallery’>Image Gallery</a></li>
    <li><a href=’#’ title=’Sitemap’>Sitemap</a></li>
    <li><a href=’#’ title=’Full Page’>Full Page</a></li>
    </ul>
    </div><!--/nav-left -->


  2. Header Logo Customization

    If you like to use the header logo in your blog same as The gazette Edition Theme default You need to edit Logo.


  3. Below Header Menu Customization

    Edit this Below Header Menu you just need to find the following codes in Template and need to replace it with your own after you use this Template.

    <div id=’suckerfish’><!-- START CATEGORY NAVIGATION (SUCKERFISH CSS) -->
    <ul id=’nav2’>
    <li><a href=’#’ title=’View all posts filed under Category Three’>Category Three</a></li>
    <li><a href=’#’ title=’View all posts filed under Category Two’>Category Two</a>
    <ul class=’children’>
    <li><a href=’#’ title=’View all posts filed under Two Point Two’>Two Point Two</a></li>
    </ul></li>
    <li><a href=’#’ title=’View all posts filed under CatOne’>CatOne</a>
    <ul class=’children’>
    <li><a href=’#’ title=’View all posts filed under Another SubCat’>Another SubCat</a></li>
    <li><a href=’#’ title=’View all posts filed under CatOne Sub’>CatOne Sub</a></li>
    <li><a href=’#’ title=’View all posts filed under Subber’>Subber</a></li>
    </ul></li>
    <li><a href=’#’ title=’View all posts filed under Featured’>Featured</a></li>
    <li><a href=’#’ title=’View all posts filed under Video’>Video</a></li>
    </ul>
    </div><!--/nav2-->


  4. Content Slider Configuration

    Edit the following block of codes in your Blogger Template otherwise you can hide it too.

    <div id=’slider-holder’>
    <div class=’slider-shelf’/>
    <span class=’clicker’>Featured Stories</span>
    <div class=’shelf-content’>
    ..............................................
    ...............................................
    .................................................
    ...............................................
    <div id=’slider-nav’>
    <span class=’slider-left’/>
    <span class=’slider-right’/>
    </div>

    </div>


  5. Read the Full Story Link Configuration

    You don't need to do anything to create expandable posts or read the full story link in your blog. I have already installed the code that will count the first 430 characters in your blog and show them before read the full story Link and remaining in the post page.


  6. “This post was written by” box Configuration
    Edit this section search for the following block of codes in your Template by expanding the widget contents and write about yourself in short there. Sorry I am unable to create that box automatic which shows about the post author itself. If I got time and made it then i will surely add this feature to this Template.

    <div class=’author_info’>
    <h3>This post was written by:</h3>

    <p>Write a little about yourself here with the thumbnail image of your aligned to right.</p> <br style=’clear:both;’/>
    <p class=’author_email’><a href=’mailto:youremail@example.com’>Contact the author</a></p>

    </div>


  7. 125×125 ad blocks on sidebar

    To keep the ads on the sidebar of your blog in a managed way like in the theme,Add the code in your sidebar by add a new page element –> Html/javascript in the same way below.

    <div id="advert_125x125">
    <a href="LINK-1"><img alt="Ad" src="LINK-1_IMAGE-SRC.jpg"/></a>
    <a href="LINK-2"><img alt="Ad" src="LINK-2_IMAGE-SRC.jpg"/></a>
    <a href="LINK-3"><img alt="Ad" src="LINK-3_IMAGE-SRC.jpg"/></a>
    <a href="LINK-4"><img alt="Ad" src="LINK-4_IMAGE-SRC.jpg"/></a>
    </div>


Download Template Now!

Free Shush Blogger Template

Free Shush Blogger Template


Download Template Now!

Free Pinki Page Blogger Template

Free Pinki Page Blogger Template


Download Template Now!

 
Copyright © 2011. Hi Template - All Rights Reserved
Template Modify by Creating Website
Proudly powered by Blogger